Wednesday, August 8, 2012

Anniversary Weekend

This past weekend was one of the most fun in a long time. We went and spent the weekend  at the beach house. There were a couple things we had on our mind...

    First; this was our 6th anniversary;
    Second; LH and I were wanting to get some alone time;
    Third; there is a new boat in the family and LH wanted to get some drive time in.

In Lincoln City I came across a great place called Barking Dog Farm. It is a great organic farm. I tasted a white apricot while there and it was the best apricot I have ever had.


The owners wife made these. Great carrot and radish doorknobs. 

Rhubarb!


We spent a good amount of time in the sand. I love the beach. It really seams to heal you - body and soul. I could never live too far from the ocean.


Hunter had a great time in the new boat and LH got some much needed drive time in.


It being our anniversary and all, LH gave me a great gift. He got me a glass blowing lesson. It was so awesome! I really want to do it again. Maybe pendent lights for the kitchen....
It was so hot in there.
I got to pick the colors (baby belly poking out there)

I really can't wait to see the final product. It all looks red and orange when the glass is so hot, but believe it or not, I used a mixture of blue/turquoise and greens.

I hope you all had as great of a weekend as I did.

Tuesday, July 31, 2012

102 Days Left


There are 102 days left until my due date. Don't get me wrong - I, in no way, expect Jude by his due date. I know better and am not holding my breath. In fact, I had a dream last week that he was 2 days late and counting...


With 3 months left, I feel like I am entering the nesting stage. We recently received the bedding and room accessories. I really enjoyed putting the room together and didn't want LH to help me much. (unless I needed his help. Like when I decided I probably couldn't fit under the crib to fix the bed skirt.....) I felt like this was something I had to do on my own.

Here are a couple sneak-peaks of Jude's room.


More to come, waiting for a couple more pieces before I can say the room is finished. Were going to get an area rug, glider, and put some additional art on the walls. Very exciting!


Sunday, July 29, 2012

Another Boy

A little while ago LH and I found out we were going to have another baby. Boy, was that exciting! We had been trying for quite a few months and I was starting to get discouraged. I had just returned from a business trip the day before, I was over a week late for that monthly appointment that us women know so well, and I has just dropped LH off at the airport for a guys trip in Las Vegas. With Hunter asleep I decided "what the heck, it wouldn't hurt anything to take a test!". Lo and behold, positive.


It was such a shock to me because I had just taken a test a day before my business trip, the day I was supposed to have my period, and it was negative.

I called up LH as fast as I could. This was our conversation;
Me: "I'm pregnant!"
LH: "What?"
Me: "I'm pregnant!" (soft crying) "I'm so happy"
LH: "Are you serious? That's great babe! See, I told you it would happen."

Our conversation was cut short since he needed to board his plane (he is at the airport after-all).

Cut to a couple months later... It's a BOY! His name is Jude and he should be here by November 10th. There are some very exciting things to come.

First trimester, about 3 1/2 months


Second trimester, over 5 months along


Tuesday, February 21, 2012

Addiction AKA Pinterest

Well, it has happened. Another night has gone by whilst sucked into my favorite pastime.


No, really. If you haven't checked it out yet, you really should. Here is the link to mine.


I use it for remembering where to buy something I want, design ideas, tutorials for things I want to try, and activities I want to do with Hunter.


I hope you enjoy. Cheers!

Tuesday, February 14, 2012

Valentines Day Challenge Day 4.... & 5

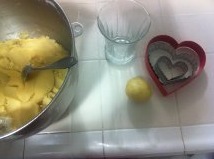
This took longer than expected and probably because I work for a living (imagine that). This Valentine's Day Challenge is Sugar Cookies!


I LOVE my recipe for these and will never turn to another. I finally perfected it to what my family likes; just like the ones you would get at a cookie shop. And the icing is perfect as well - it firms up just enough so the cookies are stackable but stays soft and doesn't get crunchy.
 Please, ignore the counters, we will be replacing them within the year (ugly things).
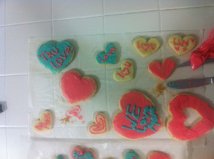
We did all heart shapes; big and small.


Hunter and LH got in on the decorating. It was a lot of fun for all of us. After Hunter was done decorating his cookies he decided it was time to decorate his body... Yeah... That boy was headed for the bath.


The cookies took two day for one reason; the cookies need to cool all the way before you can decorate them. I did not want to stay up that late. My recipe, with my notes to self, is below. Enjoy and let me know how you liked it. Did you have to change anything for your liking?


Rolled Sugar Cookies
1 1/2 Cups Softened Butter
3 Cups of Sugar
4 Room Temp. Eggs
2 Tsp Vanilla
5 Cups All-Purpose Flour
2 Tsp Baking Powder
1 Tsp Salt


In a large bowl, cream together the butter and sugar. Beat in the eggs (one by one) and vanilla. Stir in the flour, baking powder and salt. Cover and chill for at least 2 hours.
Preheat your oven to 400 degrees. Roll out your dough to 1/2" thickness (1/2" for soft cookies, 1/4" for crunchy). Cut into desired shapes and place cookies 1" apart on parchment paper. Bake about 5 min (just until the sides of the cookies start to brown). COOL COMPLETELY.
NOTE: Roll dough into balls big enough for your desired shape, take a drinking glass and dip the bottom in powdered sugar and use it to press the dough down to desired thickness. This keeps you from having to roll out the dough and, if your short on time, lets you use bits of dough at a time.


Two types of icing: Paint/Dip Icing & Butter Icing for Cookies


Paint/Dip Icing
I make this icing with Confectioners Sugar and milk. I do this by eye. You want it thin enough to spread evenly but thick enough to not run off the cookie. Add desired food coloring.
NOTE: I usually dip the tops of the cookies in the icing or paint the tops with a pastry brush if I want the entire cookie covered.


Butter Icing for Cookies
2 Cups Confectioners Sugar (sifted; this is very important)
2 1/2 Tablespoons Cream (or milk; whatever you have on hand)
4 Tablespoons Softened Butter
1 Tsp Vanilla
In a saucepan, over medium heat, heat cream and butter until butter is melted. Stir in the vanilla and sugar. Remove from the heat and beat with and electric mixer until thick and smooth. Add desired food coloring and decorate.


ENJOY!

Valentines Day Challenge Day 4.... &5

This took longer that expected and probably because I work for a living (imagine that). This Valentine's Day Challenge is Sugar Cookies!

I LOVE my recipe for these and will never turn to another. I finally perfected it to what my family likes; just like the ones you would get at a cookie shop. And the icing is firms up just enough so the cookies are stackabel but stays soft and doesn't get crunchy.
Please, ignore the counters, we will be replacing them within the year (ugly things).
We did all heart shapes; big and small.


Hunter and LH got in one the decorating. It was a lot of fun for all of us. After Hunter was done decorating his cookies he decided it was time to decorate his body. That boy was headed for the bath.

The cookies took two day for one reason; the cookies need to cool all the way before you can decorate them. I did not want to stay up that late. My recipe, with my notes to self, is below. Enjoy and let me know how you liked it. Did you have to change anything for your liking?

Rolled Sugar Cookies
1 1/2 Cups Softened Butter
3 Cups of Sugar
4 Room Temp. Eggs
2 Tsp Vanilla
5 Cups All-Purpose Flour
2 Tsp Baking Powder
1 Tsp Salt

In a large bowl, cream together the butter and sugar. Beat in the eggs (one by one) and vanilla. Stir in the flour, baking powder and salt. Cover and chill for at least 2 hours.
Preheat your oven to 400 degrees. Roll out your dough to 1/2" thickness (1/2" for soft cookies, 1/4" for crunchy). Cut into desired shapes and place cookies 1" apart on parchment paper. Bake about 5 min (just until the sides of the cookies start to brown). COOL COMPLETELY.
NOTE: Roll dough into balls big enough for your desired shape, take a drinking glass and dip the bottom in powdered sugar and use it to press the dough down to desired thickness. This keeps you from having to roll out the dough and, if your short on time, lets you use bits of dough at a time.

Two types of icing: Paint/Dip Icing & Butter Icing for Cookies

Paint/Dip Icing
I make this icing with Confectioners Sugar and milk. I do this by eye. You want it thin enough to spread evenly but thick enough to not run off the cookie. Add desired food coloring.
NOTE: I usually dip the tops of the cookies in the icing or paint the tops with a pastry brush if I want the entire cookie covered.

Butter Icing for Cookies
2 Cups Confectioners Sugar (sifted; this is very important)
2 1/2 Tablespoons Cream (or milk; whatever you have on hand)
4 Tablespoons Softened Butter
1 Tsp Vanilla
In a saucepan, over medium heat, heat cream and butter until butter is melted. Stir in the vanilla and sugar. Remove from the heat and beat with and electric mixer until thick and smooth. Add desired food coloring and decorate.

Valentines Day Challenge Day 3

Breakfast is BIG in my house and by BIG I mean; freshly grated potatoes to fry into hash-browns, fried tomatoes, eggs (any style, my favorite is poached), bacon or ham, juice, and coffee... Anyone hungry? One of my, sleeping in too late to do anything special, favorites (for the sole reason of being so easy) is Egg in a Basket. This morning I made it Valentine's Day style.


That would be breakfast for LH and Hunter (mine is still cooking). I tried to cook the bacon into a heart.... but that didn't work out too well.  I'll spare you that picture :)

Egg in the Hole
you will need:
Eggs
Slices of Bread
Butter 
In a skillet, melt butter over medium heat. Tear about a 1 1/2" hole out of the center of each piece of bread. Lightly butter front and back of the slices of bread. Place each slice of bread next to each other in the skillet. Crack eggs and, one at a time, place into the hole in the center of the bread.

After about 3 minutes, flip the bread and cook on the other side until the egg has set. The bread should be lightly toasted. Slip onto a plate and enjoy.


NOTE: I almost always use a cookie/sandwich cutter to make the holes in the slices of bread. I make dinosaurs, Millennium Falcon, Darth Vader's TIE Fighter, hearts and stars.


What is your favorite breakfast? Do you make Egg in the Hole?

Saturday, February 11, 2012

Valentines Day Challenge Day 2

I had a night out with a girlfriend and went to see The Vow
This is not crafty by any means, but I had to see it.


This was not a tear jerker like I thought it was going to be but, oh, so good. Rachel McAdams is one of my favorite actresses and was great in this film, and Channing Tatum, besides being drop-dead-gorgeous, is a great actor and plays this roll very well. This will definitely be added to my movie library.
If you haven't seen it yet, I recommend that you do. You can see the preview here. I love the way he loves her (heart melts). Enjoy!
P.S.  Channing Tatum is SO gorgeous!!! If you have no other reason to see this movie, he makes it all worth it.

These photos are not my property, nor do I claim them to be. They are owned by Sony Pictures and its affiliates. 
They are on here solely for the purpose of this blog post.

Wednesday, February 8, 2012

Valentines Day Challenge Day 1

Crayon Hearts
What you will need;

  • Thread and needle (any color, your choice)
  • Wax paper
  • Crayons, lots of crayons
  • Iron
  • Scissors
  • Hand-held pencil sharpener (to shred the crayons)
  • Something to hang them from; wire hanger, etc.
Lay out one piece of wax paper and start to shred the crayons on to it. My son and I used every color we could grab but it would look nice with similar colors put together. Now this is very important, make sure you cover the area with shredded crayon, leave no empty areas. Take another piece of wax paper, the same size as the last, and lay it over the shredded crayons. Once your iron is hot, very lightly iron the wax paper. Do not use a lot of pressure and try not to rub too much on the paper; you don't want the melted crayon coming out the sides.
Now you can cut out any design you want, Hunter and I went with hearts for Valentines Day. A couple big hearts and a lot of small ones. Once we cut our hearts, some of the edges became loose from each other; a little heat from the iron fixed that problem. 

Take your needle and thread and poke through the top part of the heart and tie a knot in the thread to keep the heart attached, then take the other end of the thread and attach it to where you want the heart to hang from. Hunter an I attached ours to a wire hanger.
This was so much fun to do with Hunter and he is so proud of it. We have it hanging in his window and it looks so cool with the sun hitting it. We will definitely be doing this again.

Monday, February 6, 2012

8 days to Valentines Day and counting

This is the goal...

I want to do one Valentines Day related item a day.

Starting tomorrow,

Lets see what we can come up with.

Pictures 1 and 3 are stock from Google, 2 and 4 are from Martha Stewart.
Related Posts Plugin for WordPress, Blogger...